How To Wallpaper: Tips And Tricks

If we have to name the easiest and the most inexpensive ways to renovate our interior space decor, wallpapering will be on top of the list. Appearing first in the 16 century, the appeal of wallpaper has already made its way back in home improvement and lifestyle trends with grace and poise. With more revised techniques and material qualities, wallpaper comes in a dazzling array of thematic and conceptual designs, natural grass cloth and unique textures.
Unfortunately, even as the most versatile home improvement technique out there, wallpaper application comes with a series of hefty chores and drawbacks, especially for beginners.
This article will explore some of the fundamental aspects of wallpaper applications with a list of tips.
Let's start.
1.Firstly, Order Wallpaper Samples
Not all wallpaper materials, colours, patterns or textures are right for interior decors. To align your vision with what works for your interior project. Order a handful of wallpaper samples before investing in wallpapers only to be let down. Different wallpaper swatches allow you to test and compare multiple designs and textures and help you make a better decision.
2.Always Order Wallpapers In A Lot
There is no harm in ordering wallpapers a bit more than your interior space requires, as accidental rips, peels, air bubbles or faulty application are very common. But ordering less in quantity might only result in an unfinished wallpaper job. As wallpapers are sold in rolls by the square foot, mismeasurement is not very common.
So, with a professional's help, estimate the maximum overhang of each wallpaper strip and purchase no less than 20% square footage than required. Another benefit of buying a lot is that you won't have to worry about mismatched lot numbers with prominent colour, texture or pattern differences.
3.Cover The Electrical Sockets
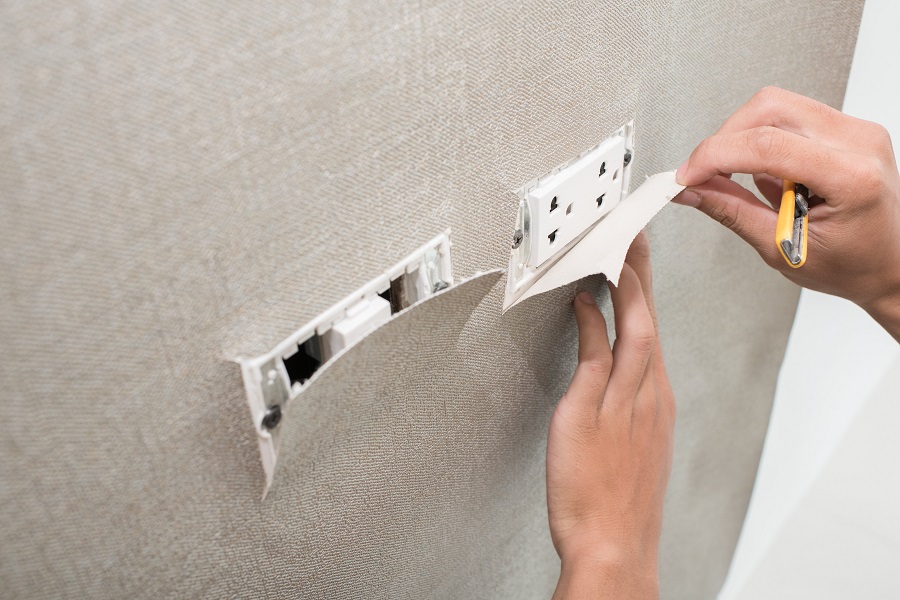
Pasting wallpaper around electric sockets and switches can be quite dangerous, especially if the walls are damp. As a general rule of thumb, we recommend you switch off the electricity. Then, with the help of an electrician, run a voltage test to make sure there is no more electricity passing through the power line.
Cover the electrical sockets and carefully use a cutter knife to cut the wallpaper around the edges crosswise in the central part of the socket or switch opening.
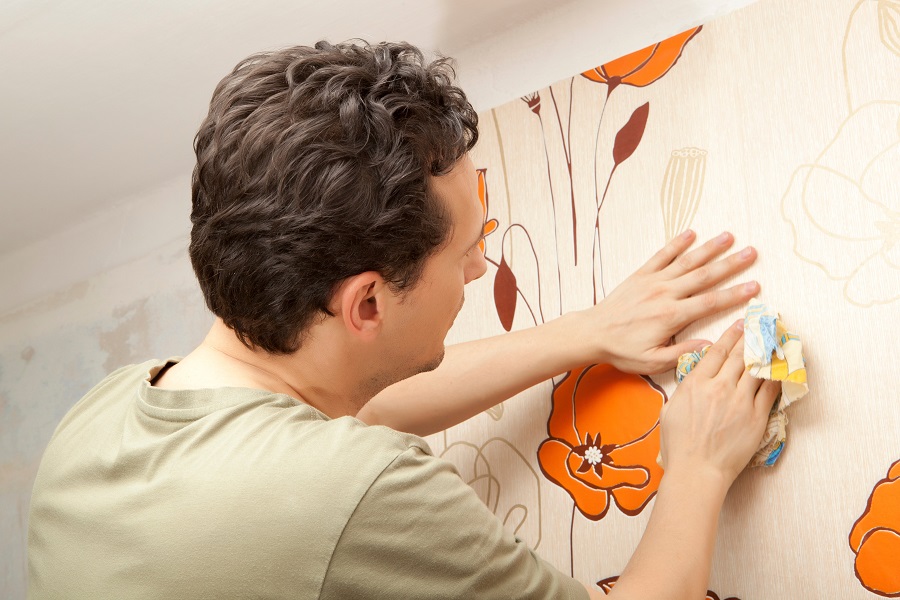
4.Be Careful With Wallpaper Creases
Wrong technique, unprepped walls, not giving enough soaking time or job done in haste will lead to creases in brand new wallpapers. In the application phase, consider dividing the surfaces into multiple sections and using a small rubber roller for wallpapering brush to press onto the walls- from top to bottom and right to left.
Once you are done evenly smoothing out the wallpapers, give the walls enough drying time.
5.Account For Wallpaper Shrinkage
Wallpapers are usually installed wet, so it is common for beginners to realize the wallpaper shrinkage after drying. Even though the wallpaper shrinkage might seem very unnoticeable at the beginning, you will soon enough start to notice the harrowing gaps around the corners of your room.
To avoid the potential eyesore your wallpapering job may cause, it's better to overlap the edges slightly while installing the wallpapers. You can remove the extra wallpapers once the walls are properly dried off.
6.Avoid Working On Bumpy Walls
Wallpapers can make dramatic changes in your interior project so that the whole wallpaper-setting thing can be quite exciting. However, do not start the process if your wall surface isn't ready for it. Wallpapering on bumpy, uneven walls with dust or grimes will only result in blotchy wallpapers.
So, consider sanding the walls with fine-grit sandpapers and applying wallpaper primer before you start the process. Alternatively, you can install the lining paper first to create a smooth surface and a strong bond between the liner and wallpaper layers.
7.High Moisture Areas Will Require Extra Attention
With the right tools and techniques, you can install wallpapers in high humidity and condensation areas like bathrooms and kitchens. However, you will have to be extra cautious in choosing the right wallpaper material. Paper-backed vinyl, fabric-backed vinyl or solid vinyl wallpapers are highly moisture and humidity resistant textures materials that are also durable, scrapable and easily removable.
You may also need to use extra layers of mould-proof wallpaper paste to prevent the wallpapers from damping. Finally, professionals recommend using acrylic varnish over the installed wallpaper to boost its moisture resistance. But you can contact a residential painting service before you make the final stroke.
8.Remember, Walls Are Hardly Ever Symmetrical
Without proper measurement, we always assume our wall corners are perfectly symmetrical, but corners are hardly ever are. So instead of installing the wallpaper, start pasting it right from the middle of the wall, using a level measurement tool. This will help you place your wallpaper straight and levelled throughout the surface.
Leave the lopsided corners after you finish covering the rest of the walls. Use the properly measured leftover wallpaper scapes to cover those ears along with minor damages or accidental rips.
9.Be Mindful Of Heat Factors and Temperature Fluctuations
Regardless of what wallpaper materials you choose, temperature fluctuations, radiators, direct sunlight, lightly illuminated areas, or any heat-producing sources can degrade the wallpaper temper and quality.
So, from storing the wallpaper rolls to applying them on the walls- you need to make sure the interior spaces are not exposed to too much light or heat fluctuation. For wallpaper applying and drying, 18 degrees celsius is the ideal room temperature.
10.High Ceilings And Walls Might Be A Tough Call
If the height of the walls is above 3 meters, you might have a hard time wallpapering all by yourself. Not just a professional ladder, high walls will require more wallpaper with the vertical extent and physical endurance to cover all the edges and corners properly.
For high ceiling walls, it's safe to just leave the job to professionals or residential painters who use professional ladders and scaffolding that may be too dangerous to be a DIY project.
11.Keep Washability Factor In Mind
One of the biggest mistakes most house owners make is not considering the washability, dirt-repellent or liquid resistance factors while choosing the wallpapers for their homes, especially in high traffic areas like kitchen, bathroom, kids' rooms, stairways etc. So, consider applying suitable wallpaper protective treatment or transparent protection foils on glutes onto the wallpapers if the wallpaper material surface is not washable.
For instance, water-resistant wallpapers usually do not come with any surface coating, making the surface non-washable and scrub-resistant. So before purchasing the wallpaper, get wallpaper swatches and run a "reaction test" with liquid washing agents to identify any sign of dampness, lack of adherence, texture change or discolouration.
Conclusion
A common perception of installing wallpapers is that it is too technical or complicated. But wallpapering is relatively easier, considering the dramatic change it can bring in your interior space just in a matter of hours! Nevertheless, even though wallpapering isn't a very difficult job itself, it's more prone to repetitive mistakes and loss of patience.